
Monday, 30 April 2012
Diary Entry Nine-Monday 30th April
The last few weeks i have been focussed on perfecting my final cuts for my magazine and i finished those in time for my deadline, last Tuesday. This week i have been working towards my evaluation, I think i will do this in a form of videos/dvd and I have been taught how to use the programme Adobe Premier Pro in order for me to create my evaluation.
Saturday, 28 April 2012
Final Cuts

This is my final cut for my front cover. I feel that this has been successful and I am pleased that my finished product is exactly what i aimed for my magazine to look like. I think that from my rough cut to my final cut a variety of minor changes have allowed me to improve the quality resulting in a professional looking music magazine. I stuck to the colour scheme, that my target audience chose, of red white and black and added certain elements such as changed the word 'Katie' to red in orger to highlight this as much as i could. I think that from looking at my front cover you can now clearly see that i have taken influence from my style model Q and looked closely at the conventions of front covers of music magazines.

This is my final cut for my contents page. I am extremely pleased with this page and the huge change from my basic rough cut to my final cut. This page is the page which needed the most work from my rough cut feedback and i think it also has the best resemblance of my style model, Q. I think that the images on this page, especially the main image, are very striking and draw the reader in, making them want to turn directly to page 46 and read the article. This is exactly what i aimed for as it was something which i liked and wanted to use from Q magazine as i think your audience is the most important aspect and this catered exactly to their needs and preferences.

This is my final cut for my double page spread. Again, i am pleased with the outcome for this page and think that although it had the least changes to be made, according to my target audience and rough cut feedback; it has come far in representing my genre and style of my magazine and style model. I think that minor details on this page have added to the overall professional look of my double page spread, for example the album information at the bottom and the date, name and page number under the seperating line. I also like the links i have created between the image and text with the fade to white from the image to text and the red line at the top going through the artists name and through to the image.
Friday, 27 April 2012
Original Images For Final Cuts

This is the image that i have taken to replace the front cover image from my rough cut. I think this image tells a lot about the artist and is more professional looking. I will crop this image to be a close up but keep the blank background at the top of the image for my title to be placed behind. I think this image connects to the audience with the look in the artists eye and entices them encouraging them to buy the magazine. I am also planning on flipping this image horizontally so that the larger section of her hair is a background for the band of text with artist features on the left of my front cover.

This is the image that i have taken to replace the contents page image from my rough cut. This image was taken around staging equiptment which i think adds an extra element of the music magazine along with the drumsticks. This image has a professional aspect to it in my opinion as it looks as though it could have been taken back stage at a gig or concert of this artist. You can also tell through this image that the featured model is involved in music by his stance and grasp of the drumsticks, again making it more realistic and appealing to a musical audience.


Thursday, 19 April 2012
Technical Guide
Throughout the process of creating my music magazine I used Photoshop for a variety of different things to ensure my magazine was as professional as possible.
How I used Photoshop for my images:


-I edited quality of her skin tone sing the following tools-spot healing brush tool, healing brush tool, patch tool


How i used Photoshop for other reasons:

I used the shape tool, crop tool, rubber, drop shadow, outer glow, emboss and bevel here to make this inset circle/sticker for my front page.
Barcode-

How I used Photoshop for my images:


-I flipped the image horizontally to fit my design of my front cover more appropriately
-I used the brightness and contrast tool to highlight her features and add extra light as the image didn't feature as much natural light as i would have liked.-I edited quality of her skin tone sing the following tools-spot healing brush tool, healing brush tool, patch tool


-I used the brightness and contrast tool again for the same reasons as above.
-I used hue and saturation and emboss tools on her nails to add colour and make it look like the shape and texture of natural nails.
-I used the dodge tool to brighten her hair and areas around her eyes


-I again used brightness and contrast to add the extra natural like that i would have preferred
-I added text with a drop shadow to stand out-i used the eyedropper tool to capture a primary colour of his drumstick to use for the colour of the text and the same tool to capture the colour of his shoe laces to use for the drop shadow colour. This in my opinion just brings the image together and is aesthetically pleasing for the reader.


-I flipped the image horizontally, to fit the layout of my double page spread here.
-I reduced the saturation scale to -100 here to make my image black and white to fit my colour scheme and create an urban
effect.
-I used the healing tool and clone stamp to take out the sticker of numbers on the
lamppost.
-I smoothened her jeans with the clone stamp and healing brush tool.
-I edited the quality of her skin using the following tools-spot
healing brush tool, healing brush tool, patch tool
-I used fade tool to add the gradual fade along the right hand side of the image.


Tuesday, 17 April 2012
Diary Entry Eight-Tuesday 17th April
This week i have continued to manipulate my magazine to improve each page in time for my final cut deadline next week. I have been making minor final changes such as perfecting the even skin tone on my front cover images using the patch and healing tool in Photoshop. I have also changed text on my front cover in order to use more fonts and colours to make my colour scheme more apparent and to incorporate certain features and conventions of current bestselling music magazines.
Wednesday, 4 April 2012
Diary Entry Seven-Wednesday 4th April
This week i created another photo planning table to plan my new photographs for my front cover and contents page as through my rough cut feedback and my own personal views i have decided to change these specific images. After taking these images i then edited them on Photoshop using: brightness and contrast, spot healing tool and patch tool.
Tuesday, 27 March 2012
Photo Planning Table Two
This is my second photo planning table for my final cuts, this is for the replacement images for the ones i decided to take out of my rough cuts.


Friday, 23 March 2012
Diary Entry Six-Friday 23rd March
Tuesday was the deadline for my rough cuts and i was ready for this by Monday, giving me extra time to change minor faults. I also got feedback from my teacher and peers this week on my rough cuts which have really helped me discover what i need to change in order to create the most professional magazine possible. After receiving my feedback i created a table presenting the results and stating how and why i will improve my magazine to utilise my feedback into my work.
Thursday, 22 March 2012
Feedback From Rough Cuts
Feedback from Rough Cuts
Like Could Be Improved
Teacher Feedback
Front
Cover- The stories and layout. Photo-use one that doesn’t need cuttingContents- Layout. Make all fonts uniform
Double Page Spread- Layout. Odd photo
Peer Feedback
Peer One
Front
Cover- Layout.
Title. Different picture. Change ‘World Exclusive’-
use a different colour or font. Don’t like the black writing against hair
Contents
Page- Images. Layout. Too much space. Too
much serif font. Maybe another pictureDouble Page Spread- Layout. Image. Edit picture. Too much red-question to black. Quote red
Peer Two
Front
Cover- Like layout, fonts and sizes. Change background colour and picture
Contents
Page- Like pictures. Change fonts-make more interesting. Use bigger titles. Too slanted
photo of Joe. Double Page Spread- Like picture, effect on the picture and layout. Add caption to picture, Write info on who wrote article and about C.D
Peer Three
Front
Cover-Like layout, union jack circle and barcode.
Change photo and font on Katie.
Contents
Page- Like all of it. Change logo.Double Page Spread- Like picture. Change shorten questions and edit picture.
Peer Four
Front Cover- Like the model-fits magazine genre. Change the image, more features.
Contents Page- Like colour scheme. More pictures
Double Page Spread- Like picture. Add another photo, add captions.
How i will improve my magazine using these comments
From the comments i have recieved i have noticed that the majority of people like the layout of each of the pages in my magazine, mainly the cover and double page spread, so i think that i will try and keep that mostly the same. For the front cover most people have said to use a different picture, i agree with this statement and will therefore be taking a different image that has more natural light and doesn't need cutting. For my contents page people commented on the images, the space and the un-tidiness of the text. I again agree with each of these and will aim to change one of the images to add variety, add more features and text to fill in the space and re-arrange the text. The comments for my double page spread were mostly positive apart from people suggesting captions for the image and for the image to be edited, so i will therefore be editing the image more to appeal to my target audience also.
From the comments i have recieved i have noticed that the majority of people like the layout of each of the pages in my magazine, mainly the cover and double page spread, so i think that i will try and keep that mostly the same. For the front cover most people have said to use a different picture, i agree with this statement and will therefore be taking a different image that has more natural light and doesn't need cutting. For my contents page people commented on the images, the space and the un-tidiness of the text. I again agree with each of these and will aim to change one of the images to add variety, add more features and text to fill in the space and re-arrange the text. The comments for my double page spread were mostly positive apart from people suggesting captions for the image and for the image to be edited, so i will therefore be editing the image more to appeal to my target audience also.
Double Page Spread Rough Cut Audience Feedback
Like- Fade between image and text
-Quote
-Colour scheme of question and answers
Change- Make top bar smaller or change the colour
-Fill in the gap at the bottom with details on her album for promotion
Contents Page Rough Cut Audience Feedback
This video features two of my target audience explaining what they like and what they would change about my contents page rough cut. Feedback includes:
Like- Main image
-Numbers on images
-Similarities to style model, Q
Change- Structure the left hand side text and more text could be added
-Enlarge the title of the page
Front Cover Rough Cut Audience Feedback
This video features two of my target audience explaining what they like and what they would change about my front cover rough cut. Feedback includes:
Like- Block cover stories along the side
-Name of the magazine
Change- Outline cover stories to make them stand out more
-Fill in the space on the right hand side
Tuesday, 20 March 2012
Double-Page Spread Rough Cut

This is my Double Page Spread rough cut. I really like this page as the style and vibe i wanted to create comes across well on here. I think i will change a few minor problems in order to make this perfect for my final cut such as the bar along the top and more editing of the image.
Contents Page Rough Cut

This is my Contents Page rough cut. I again like the layout of this page however i think that there are far too many gaps and that will therefore be my focus to improve for my final cut.
Front Cover Rough Cut

This is my Front Cover rough cut. I am pleased with the layout of my cover however i will be changing the main image for my final cut as i dont like the makeup or how i had to cut around the model. Apart from the image i am happy with this and in order to improve this for my final cut i think i will move the text around to fill the page and also change the large 'katie' as i think that looks ammature.
Tuesday, 6 March 2012
Original Images For Rough Cuts


This image is for my contents page. I like this image esspecially because of the studio lighting and the movement that the drumsticks have created. However i may also change this for my final cut as my other image is stronger for my contents page and they are both on a studio/blank background and i would like to have more differentiation within my magazine when it comes to images.

This is my main image for my contents page. I really like this image and think i will keep this image for my final cut also, partly due to the model's hair flowing down the right hand side and the use of a partial over the shoulder shot.

This is my image for my double page spread. I love this image, with the props of the lampost and trilby against the brick wall. This creates the exact feel i wanted for my double page spread, however i think i may edit this to be flipped horizontally so that it's as if the model is leaning on the left hand side of my double page spread.
Monday, 5 March 2012
Diary Entry Five-Monday 5th March
This weekend I followed my photo planning table and took my photos on Saturday. They all worked out how i had planned however, I am still unsure on how the main image for my front cover looks along with the rest of the design. With my pictures all included in my template on InDesign now my magazine is starting to come together in time for my rough cut deadline. After looking closely at the conventions of music magazines, especially Q, my magazine is now beginning to fit in closely with Q's style and genre.
Friday, 2 March 2012
Photo Planning Table
This is my photo planning sheet which i have created to help me plan for taking my images, this will keep me organised and ensure i capture the exact image i need for each page.

Location Description
Location One-Blank white wall in room. I decided to use this as my location for my front cover image as it features a plain white blank painted wall so therefore is a basic background perfect for a close up or mid-shot image. I also decided on this location as it is directly facing a window which provides a lot of natural light, making my images have natural lighting rather than the simple camera flash.
Location Two-Brick wall in a backstreet of Tynemouth. I decided to use this as the location for taking my double page spread photos as it represented the artist and connected with the style and genre of my magazine. The brick wall and the base of the lamppost created an urban vibe and allowed the audience to get a bit more information about the artist just from the location. This location also fitted well with the layout of my double page spread as the artist was going to be on the left hand side then a gradual fade into the text and this effect worked really well with the fade of the rugged bricks.
Location Three-School stage. This location was chosen for my contents page image as i thought that the staging equiptment would be a good prop for the artist to either stand infront of or sit on it. This incorporated well with the prop of the drumsticks in this image also, creating a rock and roll feel for the particular artist. The staging and dark lighting could also insinuate that the image was taken back stage of a gig making my images more realistic to the music industry.
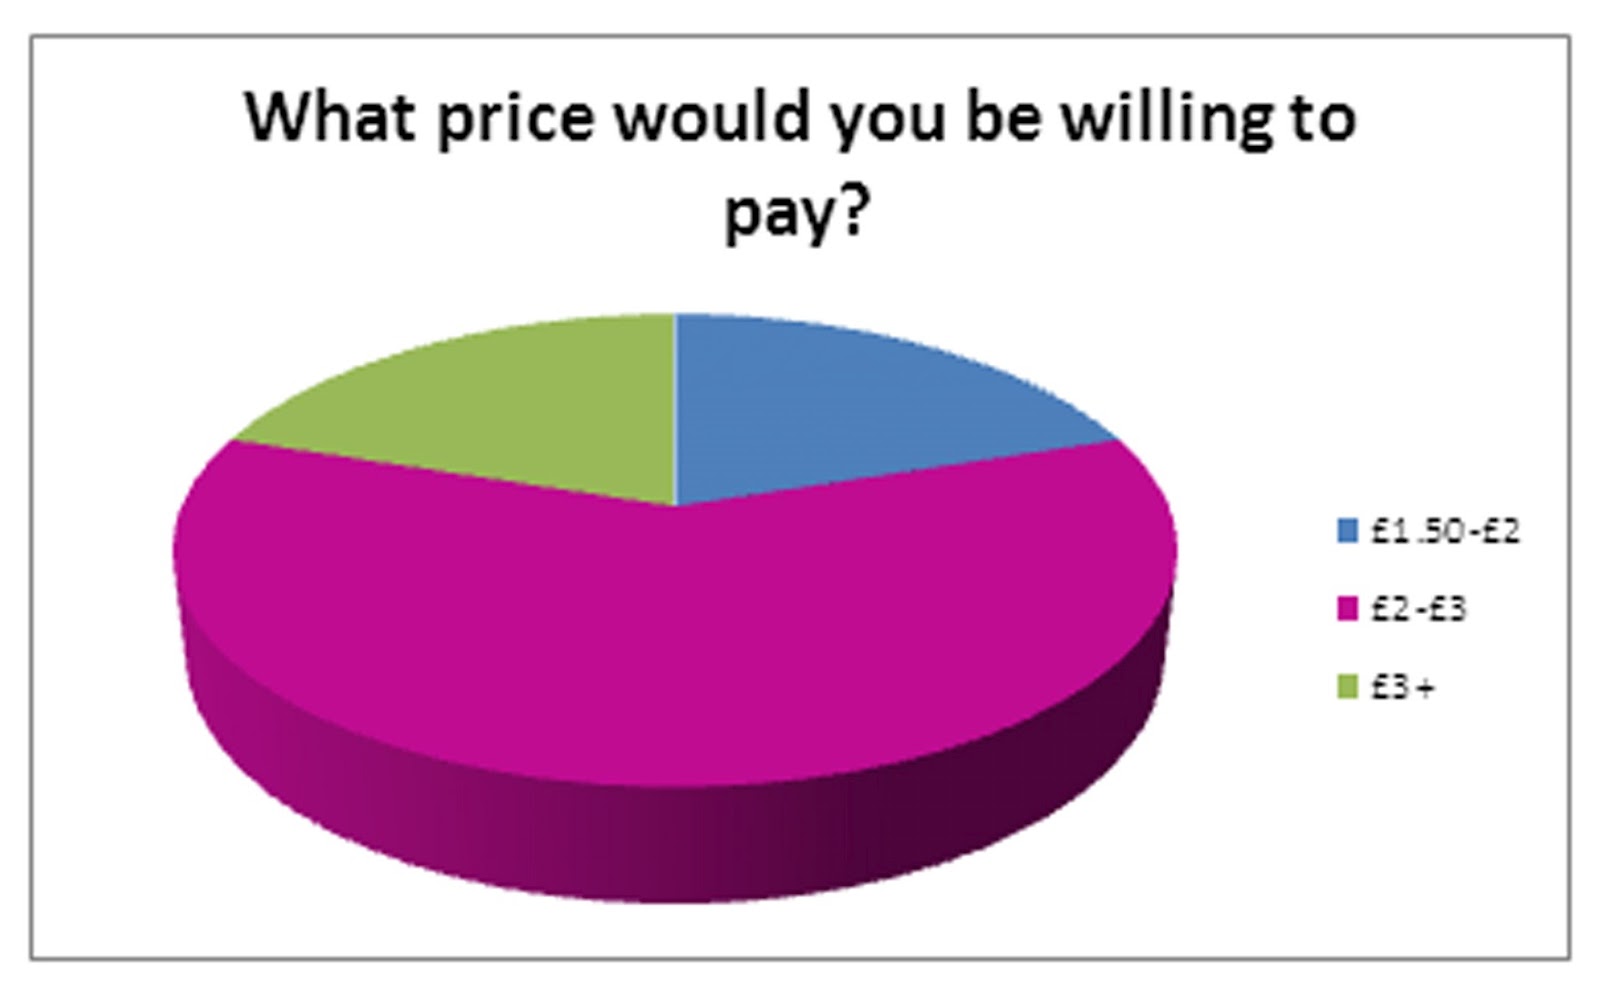
Audience Research-Questionnaire Results
.jpg)


Half of my target audience prefer question and answer format articles and others include new bands and life stories. For my article i will therefore look to create an article in a question and answer format with a feature of my newly created artist being relitavely new to the music industry. By doing this i would hope that it would draw my readers in and excite them about my magazine, as does my style model Q.

My audience had a variety of different ideas on what would make them buy one magazine over the other so i will therefore try and incorporate as many as possible into my magazine, whilst still keeping my style that i am aiming for. Although two of my audience said they'd prefer 'freebies' and 'gifts' i don't think i will include these as i want to keep the sophisticated and classy style that Q magazine has, of which rarely gives out free things. However i am going to leave this thought open to decide at a later date what looks best as my magazine is forming.
Audience Research-Questionnaire

This is a copy of the questionnaire i gave to my target audience in order to find out exactly what they look for in a music magazine. These results will therefore help me to design and create my magazine to cater for my audience.
Wednesday, 29 February 2012
Double-Page Spread Sketch

This is my double page spread initial sketch which i focused mainly on the layout for which I like and will hope to keep similar for my rough cut. However i think that the image will be hard to capture due to the need of two large amps. I asked my target audience their opinion on the effectiveness of this image to find out whether it was worth getting the amps or whether to change the image. My target audience said "I really like the concept of this image but you could use other objects or places to reate a similar effect". This view really helped me on my decision and i think i will now change this image for my rough cut.
Contents Page Sketch

This is my contents page initial sketch. I like the layout used here and would hope to keep the majority of this the same for my rough cut, however my views may change as i carry out the process. Afer showing my target audience this draft a few comments were: "The layout is very effective and reminds me of Q" and another was "I like it but think it needs more text and something to make it stand out".
Front Cover Sketch

This is my initial front cover sketch which i have used to draft my ideas of what i would like my front cover to look like. However i know that there are faults but these are what i will focus on changing in the process of making my rough cuts. I have shown my target audience this and a few of their responses were: "Add more features around the outside, it's too basic." and "I like the bubble at the side." I agree with both of these comments and would also like to change to banner along the top and the layout for my rough cut.
Monday, 27 February 2012
My Initial Ideas Diagram

I created this diagram to present all of my initial ideas in one place for me to be able to pick and choose which elements would fit well together in preperation for creating my magazine. This has given me a lot of help and guidance in deciding each element, eventually enabling me to decide on my colour scheme, target audience, title and layout for each page.
Friday, 24 February 2012
Diary Entry Four-Friday 24th February
This week i have completed my initial ideas diagram, initial sketches and began my audience research. My initial ideas diagram has helped me to see all of my ideas to pick out the ones that fit the best together to begin to create my magazine. This then assisted me in drawing my initial sketches for my front cover, contents page and double page spread, revealing what exactly my thoughts look like on paper as a template for my rough cuts.
Monday, 20 February 2012
Diary Entry Three-Monday 20th February
This week I decided that the genre I would like my magazine to be is the higher end of popular music, similar to Q magazine. We had a lesson on audience research, identifying my target audience as both sexes, interested in popular music also focussing towards the ages of 16-35. Although this may change as my audience research becomes more thorough, I can adapt my initial ideas to what appeals to my target audience. I am now in the process of constructing a questionnaire for my target audience, enabling me to find out exactly what they like and what they want to see in a music magazine.
Saturday, 18 February 2012
Double Page Spread Analysis Five

NME have created a very effective double page spread here
featuring artist Lily Allen. A quote from the artist herself takes up a large
amount of the page, standing out and instantly grasping the reader’s attention.
The font and size of the text has been chosen carefully relating to the quote,
stating “people think I’m an attention seeker”, this seeks immediate attention from
the reader, whilst making the quote stand out in block capitals and a variety
of font sizes in the form of a newspaper headline cut outs. The text for the
article is in four equal width columns, opened with a drop capital to stand
out. I prefer text like this in magazines as it tells you information that you
want to hear about the artist but it doesn’t bombard you with too much text and
columns, discouraging you from reading on. I will try and incorporate this into
my double page spread, ensuring I don’t use too little or too much text to
create the same effect that NME has done here.
The image
of artist Lily Allen is extremely striking and whilst the colours link in with
the magazines colour scheme we can instantly tell her personality from the
image. Her hands are on her hips suggesting that she can be quite stubborn and
bossy, relating to the quote about attention seeking, then her head is tilted
with her eyes still focussed on the reader, drawing us in. I like the eye
contact between artist and reader and think it works effectively in drawing the
reader in and making it feel personal to them, so I will therefore utilise this
technique in my double page spread.
Subscribe to:
Comments (Atom)